Previously we have added MQTT to the IoT Gateway as part of the Organic Gardner Project. This gave the gateway the ability to collect and store a lot of environmental data from sensors all over the place.
Now we need to provide a way for others programs, like the IoT Dashboard access that data via a REST API.
Implementing a RESTful API
The RESTful API convention is exteremely popular, well supported and is perfectly suited to providing access to the sensor data that has been collected. REST is ubiquitous these days, most people involved in frontend or backend development most likely have quite a bit of experience with REST.
For those not so familiar may find it interesting to know that REST is neither a protocol nor a standard but a rather brilliant conventional usage of the existing HTTP protocol aimed primarily at machine to machine communication.
HTTP, HTML and REST
HTTP is used to serve up a traditional webpage by accepting a client request to a URL along with some optional arguments. The response returns a file with HTML to be displayed in a browser capable of rendering HTML for human consumption.
HTTP when used for automation or machine to machine communication can take the same style URL and optional arguments to produce a file of another format typically JSON these days, making it easy for another program including a web application to easily access and use this data.
JSON is the most widely used formay for RESTful APIs, however other formats like: XML, SOAP, binary or csv can also be used.
Just like MQTT, HTTP is also built on top of TCP which passes along all the goodness TCP provides in particular reliability and efficient use of network bandwidth.
Go HTTP Package
Go has a small, robust and very efficient implementation of the HTTP protocol for both clients and servers. The IoT Gateway will import this package giving it an embedded web server allowing the gateway to serve up the sensor data and eventually the webapp without the overhead of an additional HTTP server like nginx or apache.
The following code is a minimal but full working HTTP server capable of handling heavy loads for a sustained period of time.
import (
    "time"
    "net/http"
)

// Msg holds each datapoint as it arrives
type Msg struct {
    StationID   int         `json:"station-id"`
    SensorID    int         `json:"sensor-id"`
    Timestamp   time.Time   `json:"time"`
    Value       interface{} `json:"value"`
}

// DataCache is an array (queue) of Msg's that are pushed to
// the rear of the message.
type DataCache struct {
    Data    []Msg           `json:"data"`
}

var cache DataCache

// ServeHTTP satifies the http.Server interface requirement hence
// allows our global data cache structure to act as the *receiver*
// function for the DataCache struct.
func (d DataCache) ServeHTTP(w *http.Writer, r http.Request) {
    // Only allow read requests
    if r.Method != "GET" {
		w.WriteHeader(http.StatusMethodNotAllowed)
		return
	}
	json.NewEncoder(w).Encode(d)
}

func main() {
    flags.Parse()

    http.RegisterFunc("/api/v01/data", d)

    // Start listening on port 8080 on any interface
	err := http.ListenAndServe(":8080", nil)
    log.Println("HTTP Server has stopped ", err)
}
This example demonstrates a couple points: first it is very easy to add an embedded webserver to an application by following these three basic steps:
- Define the endpoints the application will support
- Write the callbacks that will handle incoming HTTP requests
- Start up the HTTP server and listen for incoming HTTP requests.
Let’s unravel these points a bit more.
Define Endpoints
When discussing APIs the term endpoint simply means the root of
the URL that demarcs API calls effecting a particular group of
data. In our example we have a single endpoint also known as a URI:
/api/v01/data.
Endpoints are appended to a base URI that results in the complete URL that will be used by a client to retrieve the specific data a client is interested in.
For example: If the base URL is https://example.com the complete
URL for this application end points becomes:
https://example.com/api/v01/data
The IoT Gateway is now able to allow any HTTP client to send a GET Request to the server and get a bundle of data back.
NOTE: we have not implemented any security preventing anybody access to the data. HTTP and API security will be addressed in a later writing.
Testing an Endpoint
We can use the incredible curl to test our endpoint
with a single command.
% curl http://example.com/api/v01/data
...
We are going to be using curl a lot for testing and debugging as the project progresses. With 4 endpoints to be implemented there will be plenty of testing ahead!
Refering to the line
if r.Method != "GET" {
		w.WriteHeader(http.StatusMethodNotAllowed)
		return
}
From this code snippet we can see only the GET HTTP request type is supported. In other words we are allowing READ ONLY requests, no POSTS, PATCHES, or DELETEs (only -R– of CRUD).
Do notice how easy it is to return a proper error to our mis-informed user.
Auto encoding JSON for HTTP Request
This single line of code is pretty amazing. We simply pass the DataCache variable we want to return to the user to the Encode() function to be magically encoded into JSON.
json.NewEncoder(w).Encode(d)
This causes our Msg above to look like this:
{
    "data": [
        {
            "station-id": "station-01",
            "sensor-id": "tempf",
            "time": "2020-02-02T23:32.12Z",
            "value": "76.32"
        },
        {
            ...
        }
    ]
}
One reason it is so easy for Go to encode a structure into JSON is due
to reflection with the help of these string literal tags refering to
the `json:"xxx"`.
Check out the encoding/json package for more detail.
Classes vs. Functions as Callbacks
Go has a very unique approach to Object Oriented (OO) programming. While it has types and methods it does not have a type hiearchy also known as inheritance. Rather Go approaches the solution by encouraging composition. An interesting nuance that will be handled in another article.
For those familiar with OO terminology the Go type struct is similar to a Class where a reciever is similar to an Object (or instantiation of the type).
That brings us to an interesting twist on providing the typical callback. In most langauges a callback is expected to be a function, in some cases the callback can be a method of a class by using a little bit of pointer trickery to use a method of object allowing the callback access to the objects private variables and methods.
Go can handle simple functions as callbacks by using the
http.RegisterFunc() method. However, Go also allows one to add
the method ServeHTTP(w http.Responsewriter, r *http.Request)
to any type instantly making that type capable of accepting
callbacks.
A type with ServeHTTP method
That was all a bit abstract and maybe confusing, a simple example will clarify things a bit.
The Data type and /data endpoint and callback
type Configuration struct {
    Addr        string      `json:"addr"`
    Broker      string      `json:"broker"`
}

var config Configuration

func (c Configuration) ServeHTTP(http.Request r, *http.Writer) {
    json.NewEncoder(w).Encode(c) // encode config
}

func main() {
    http.Register(config)
}
By adding the ServeHTTP function to the type reciever
allows these Go instatiations with the ability to handle HTTP
requests! I don’t know about you, but I think that is pretty far out!
MQTT to REST Demo
OK now we have something interesting to start working with! The IoT Gateway collects MQTT sensor data, stores it in RAM and a REST interface that can be used by an API client to fetch the cached data.
Let’s get a demo going…
Mocking MQTT publisher and a REST client
To demonstrate (test) the development we have done for the IoT Gateway
implementation to this point we’ll need to fake sensor data using
mosquitto_pub and likewise use curl to fetch the fake
sensor data as an API client.
Starting the Demo
The iothub will subscribe to the MQTT Topics ss/data/+/+
and ss/net/announce for the network of stations. The HTTP
package opens a TCP socket on port 8011 (by default) and waits for
incoming HTTP requests.
The top part of the screen from the image below the top part of screen captured below show the output from iothub program.
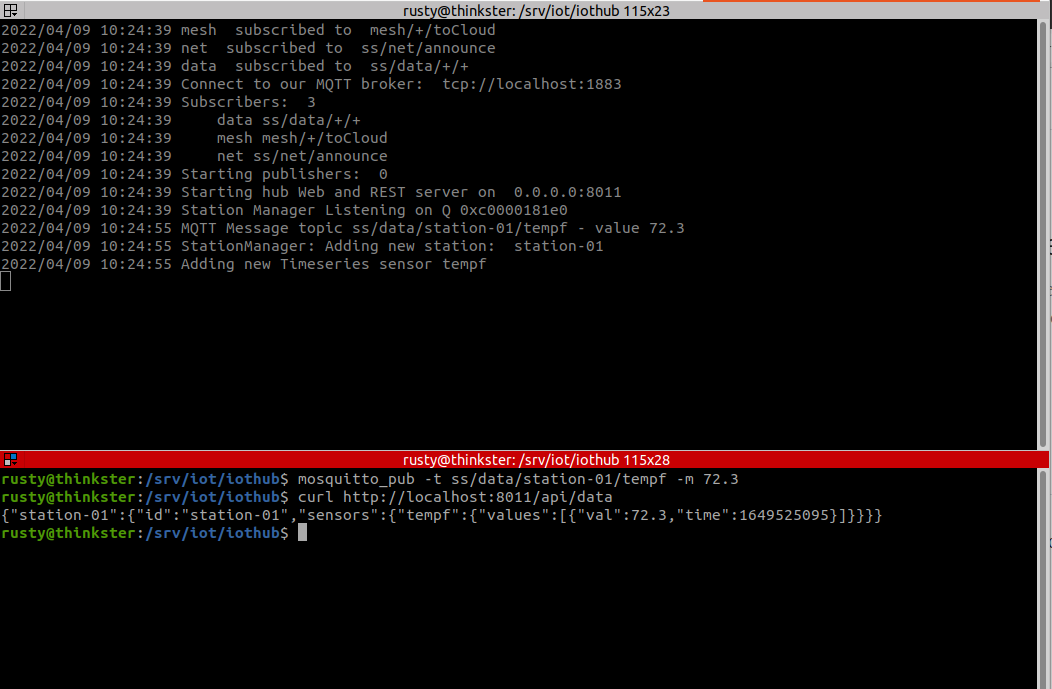
The lower screen shows two commands: the first command is
mosquitto_pub mocking a temperature value.
% mosquitto_pub -t ss/data/station-01/tempf -m 72.3
Followed by a the curl command mocking a REST client much
like the dashboard will access historical data sensor data.
the to the REST API data endpoint.
This example returns the single data point we have collected.
% curl http://localhost:8011/api/data
{"station-01":{"id":"station-01","sensors":{"tempf":{"values":[{"val":72.3,"time":1649525095}]}}}}
If you are playing along at home, feel free to send a lot of data
points and mix in new stations and sensors. That will demostrate how
the IoTHub caches data. Put mosquitto_pub in a loop and let it
run for a while!
What Next? Web App or Real Sensors?
Now we have a very simple but working IoT Gateway! There are more cool features to be added to the gateway, however that let’s consider working on one of the other components of the project.
We are mocking both the Collector responsible for gathering and publishing sensor data as well as the Dashboard which is an API client that consumes the sensor data.
Development can begin on either the Collector or Dashboard at anytime, actually development could have taken place while we started building the hub by also mocking the hub before it was ready.
Gathering real data with real sensor hardware is exciting, I think it will become more meaningful to many people if we start developing the Webapp now since a visual representation of the data will resonate with most people vs. looking at raw data in JSON format.
Next Up the Web App UI
On to the next milestone: building the dashboard to display historical data. The Dashboard is going to be what is known as a Responsive Single Page Application (SPA) written with the Vue reactive framework.
Anyhow, get ready for GUI interfaces next!
Next IoT Dashboard in Vue